(一)对Dlib库初识


此处Dlib官方网站

一、安装Dlib库

Dlib库简介

Dlib is a modern C++ toolkit containing machine learning algorithms and tools for creating complex software in C++ to solve real world problems. It is used in both industry and academia in a wide range of domains including robotics, embedded devices, mobile phones, and large high performance computing environments. Dlib’s open source licensing allows you to use it in any application, free of charge.

To follow or participate in the development of dlib subscribe to dlib on github. Also be sure to read the how to contribute page if you intend to submit code to the project.

To quickly get started using dlib, follow these instructions to build dlib.

  1. 安装cmake库

  2. 安装boost库

  3. 安装dlib库

    1
    2
    3
    4
    pip install cmake
    pip install boost
    # whl文件在下方链接中
    pip install dlib-19.19.0-cp37-cp37m-win_amd64.whl

Dlib库whl文件下载地址

Dlib相关文件

还可以添加face_recognition库等等。

二、 代码运行样例测试

环境配置需求

1
2
3
4
5
6
7
8
9
10
11
12
13
14
15
16
17
18
19
20
21
22
23
24
25
26
27
28
29
30
31
32
33
blurhash==1.1.4
boost==0.1
certifi==2022.12.7
charset-normalizer==2.1.1
click==8.1.3
cmake==3.25.0
colorama==0.4.6
decorator==5.1.1
dlib @ file:///F:/Desktop/face_recog_dlib_file/dlib-19.19.0-cp37-cp37m-win_amd64.whl
face-recognition==1.3.0
face-recognition-models==0.3.0
greenlet==2.0.1
idna==3.4
imageio==2.22.4
importlib-metadata==5.1.0
Mastodon.py==1.8.0
networkx==2.6.3
numpy==1.21.6
opencv-python==4.6.0.66
packaging==22.0
Pillow==9.3.0
python-dateutil==2.8.2
python-magic==0.4.27
PyWavelets==1.3.0
requests==2.28.1
scikit-image==0.19.3
scipy==1.7.3
six==1.16.0
SQLAlchemy==1.4.45
tifffile==2021.11.2
typing_extensions==4.4.0
urllib3==1.26.13
zipp==3.11.0

代码样例

1
2
3
4
5
6
7
8
9
10
11
12
13
14
15
16
17
18
19
20
21
22
23
24
25
26
27
28
29
30
31
32
33
34
35
36
37
38
39
40
41
42
43
44
45
46
47
48
49
50
51
52
53
54
55
56
57
58
59
60
61
62
63
64
65
66
67
68
69
70
71
72
73
74
75
76
77
78
79
80
81
82
83
84
85
86
87
88
89
90
91
92
93
94
95
96
97
98
99
100
101
102
103
104
105
106
107
108
109
import os
import cv2
import dlib
import numpy as np
from collections import OrderedDict
import warnings
warnings.filterwarnings("ignore")

# https://mydreamambitious.blog.csdn.net/article/details/123535760
# 对于68个检测点,将人脸的几个关键点排列成有序,便于后面的遍历
shape_predictor_68_face_landmark = OrderedDict([
('mouth', (48, 68)),
('right_eyebrow', (17, 22)),
('left_eye_brow', (22, 27)),
('right_eye', (36, 42)),
('left_eye', (42, 48)),
('nose', (27, 36)),
('jaw', (0, 17))
])


# 绘制人脸画矩形框
def drawRectangle(detected, frame):
margin = 0.2
img_h, img_w, _ = np.shape(frame)
if len(detected) > 0:
for i, locate in enumerate(detected):
x1, y1, x2, y2, w, h = locate.left(), locate.top(), locate.right() + 1, locate.bottom() + 1, locate.width(), locate.height()

xw1 = max(int(x1 - margin * w), 0)
yw1 = max(int(y1 - margin * h), 0)
xw2 = min(int(x2 + margin * w), img_w - 1)
yw2 = min(int(y2 + margin * h), img_h - 1)

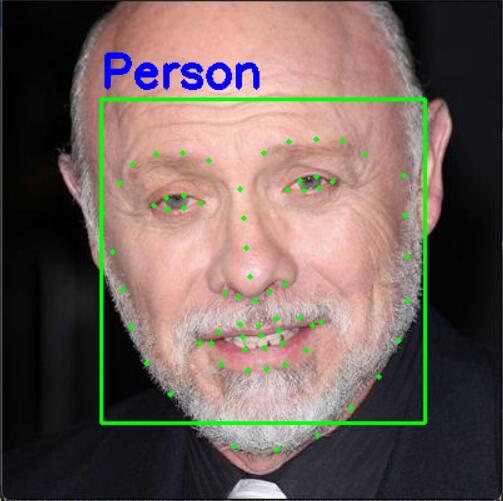
cv2.rectangle(frame, (x1, y1), (x2, y2), (0, 255, 0), 2)

face = frame[yw1:yw2 + 1, xw1:xw2 + 1, :]
cv2.putText(frame, 'Person', (locate.left(), locate.top() - 10),
cv2.FONT_HERSHEY_SIMPLEX, 1.2, (255, 0, 0), 3)
return frame


# 对检测之后获取的人脸关键点坐标进行转换
def predict2Np(predict):
# 创建68*2关键点的二维空数组[(x1,y1),(x2,y2)……]
dims = np.zeros(shape=(predict.num_parts, 2), dtype=np.int)
# 遍历人脸的每个关键点获取二维坐标
length = predict.num_parts
for i in range(0, length):
dims[i] = (predict.part(i).x, predict.part(i).y)
return dims


# 加载人脸检测与关键点定位
# http://dlib.net/python/index.html#dlib_pybind11.get_frontal_face_detector
detector = dlib.get_frontal_face_detector()
# http://dlib.net/python/index.html#dlib_pybind11.shape_predictor
criticPoints = dlib.shape_predictor("shape_predictor_68_face_landmarks.dat")


# 遍历预测框,进行人脸的关键点绘制
def drawCriticPoints(detected, frame):
for (step, locate) in enumerate(detected):
# 对获取的人脸框再进行人脸关键点检测
# 获取68个关键点的坐标值
dims = criticPoints(frame, locate)
# 将得到的坐标值转换为二维
dims = predict2Np(dims)
# 通过得到的关键点坐标进行关键点绘制
# 从i->j这个范围内的都是同一个区域:比如上面的鼻子就是从27->36
for (name, (i, j)) in shape_predictor_68_face_landmark.items():
# 对每个部位进行绘点
for (x, y) in dims[i:j]:
cv2.circle(img=frame, center=(x, y),
radius=2, color=(0, 255, 0), thickness=-1)
return frame


# 单张图片的人脸关键点检测
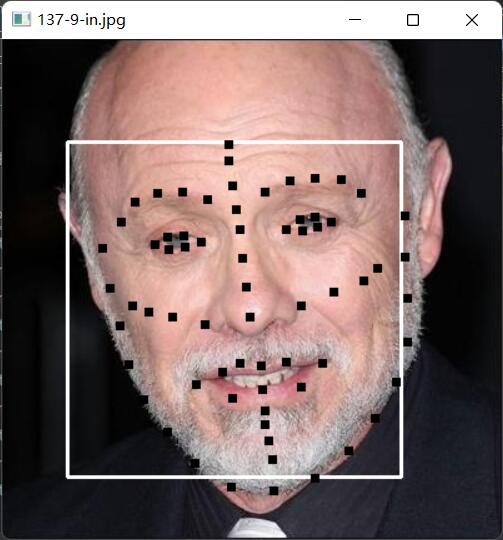
def signal_detect(img_path='137-9-in.jpg'):
img = cv2.imread(img_path)
detected = detector(img)
frame = drawRectangle(detected, img)
frame = drawCriticPoints(detected, img)
cv2.imshow('frame', frame)
cv2.waitKey(0)
cv2.destroyAllWindows()


# 实时的人脸关键点检测
def detect_time():
cap = cv2.VideoCapture(0)
while cap.isOpened():
ret, frame = cap.read()
detected = detector(frame)
frame = drawRectangle(detected, frame)
frame = drawCriticPoints(detected, frame)
cv2.imshow('frame', frame)
key = cv2.waitKey(1)
if key == 27:
break
cap.release()
cv2.destroyAllWindows()


if __name__ == '__main__':
print('Pycharm')
signal_detect()
# detect_time()

代码运行展示

运行结果

三、 特征点标定

使用openCV与dlib实现人脸68特征点的检测与手动修改

1
2
3
4
5
6
7
8
9
10
11
12
13
14
15
16
17
18
19
20
21
22
23
24
25
26
27
28
29
30
31
32
33
34
35
36
37
38
39
40
41
42
43
44
45
46
47
48
49
50
51
52
53
54
55
56
57
58
59
60
61
62
63
64
65
66
67
68
69
70
71
72
73
74
75
76
77
78
79
80
81
82
83
84
85
86
87
88
89
import sys
import cv2
import dlib
import numpy as np

# 定义全局变量
LButtonFirstAction = False
MovingPoint = False
PreviousPosition = (-1, -1)
PreviousPointColor = np.zeros([7, 7, 3])
MovingPNum = -1
IniPointColor = np.zeros([68, 7, 7, 3])

# 获取训练模型
predictor_path = "shape_predictor_68_face_landmarks.dat"

# 使用官方提供的模型构建特征提取器
predictor = dlib.shape_predictor(predictor_path)

# 使用dlib自带的frontal_face_detector作为人脸检测器
detector = dlib.get_frontal_face_detector()


# 返回检测框边缘坐标与人脸特征点矩阵(68*2)
def get_landmarks(img, predictor, detector):
rects = detector(img, 1)
edge = [(rects[0].left(), rects[0].top()), (rects[0].right(), rects[0].bottom())]
return edge, [(p.x, p.y) for p in predictor(img, rects[0]).parts()]


def on_mouse(event, x, y, flags, marks):
# 全局变量声明
global LButtonFirstAction
global MovingPNum
global MovingPoint
global PreviousPosition
global PreviousPointColor
global IniPointColor

# 鼠标左键按下
if event == cv2.EVENT_LBUTTONDOWN:
LButtonFirstAction = True
for i in range(68):
if np.sqrt(np.square(x - marks[i][0]) + np.square(y - marks[i][1])) < 10:
MovingPNum = i
MovingPoint = True
print("Moving point %d" % i)

# 鼠标左键抬起
elif event == cv2.EVENT_LBUTTONUP:
if MovingPoint:
IniPointColor[MovingPNum] = PreviousPointColor
print("Point {} was moved to location{}".format(MovingPNum, (x, y)))
MovingPNum = -1
MovingPoint = False

# 鼠标移动
elif event == cv2.EVENT_MOUSEMOVE:
if MovingPoint and MovingPNum != -1:
if LButtonFirstAction:
PreviousPointColor = IniPointColor[MovingPNum]
LButtonFirstAction = False
PreviousPosition = marks[MovingPNum]
marks[MovingPNum] = (x, y)
img[PreviousPosition[1] - 3:PreviousPosition[1] + 4,
PreviousPosition[0] - 3:PreviousPosition[0] + 4, :] = PreviousPointColor.copy()

PreviousPointColor = img[y - 3:y + 4, x - 3:x + 4, :].copy()
img[y - 3:y + 4, x - 3:x + 4, :] = np.zeros([7, 7, 3])


f = '137-9-in.jpg'
img = cv2.imread(f)
edge, marks = get_landmarks(img, predictor, detector)
cv2.rectangle(img, edge[0], edge[1], (255, 255, 255), thickness=2)
# 计数器
i = 0
for p in marks:
IniPointColor[i] = img[p[1] - 3:p[1] + 4, p[0] - 3:p[0] + 4, :].copy()
img[p[1] - 3:p[1] + 4, p[0] - 3:p[0] + 4, :] = np.zeros([7, 7, 3])
i += 1
cv2.namedWindow(f, cv2.WINDOW_AUTOSIZE)
# 调用鼠标响应事件
cv2.setMouseCallback(f, on_mouse, marks)
while (1):
cv2.imshow(f, img)
if cv2.waitKey(20) & 0xFF == 27:
break
cv2.destroyAllWindows()

修改部分特征点位置后的图像

1
2
3
4
5
6
7
8
9
10
11
12
13
14
15
16
17
18
19
20
21
22
23
24
25
26
27
28
29
30
31
32
33
34
35
36
37
38
39
40
41
42
43
44
45
46
47
48
49
50
51
52
53
54
55
56
57
58
59
60
61
62
63
64
65
66
67
68
69
# 特征点位置
0 (78, 168)
1 (86, 201)
2 (94, 232)
3 (102, 264)
4 (116, 292)
5 (137, 317)
6 (159, 341)
7 (187, 359)
8 (221, 360)
9 (254, 349)
10 (280, 326)
11 (300, 300)
12 (317, 272)
13 (323, 240)
14 (321, 205)
15 (320, 172)
16 (319, 140)
17 (93, 146)
18 (105, 131)
19 (124, 123)
20 (145, 122)
21 (166, 128)
22 (209, 122)
23 (229, 113)
24 (251, 110)
25 (271, 113)
26 (288, 124)
27 (190, 153)
28 (193, 175)
29 (195, 198)
30 (198, 221)
31 (176, 234)
32 (189, 237)
33 (202, 240)
34 (214, 234)
35 (225, 228)
36 (122, 165)
37 (132, 158)
38 (145, 157)
39 (159, 161)
40 (146, 167)
41 (133, 168)
42 (227, 152)
43 (237, 144)
44 (250, 142)
45 (263, 146)
46 (252, 151)
47 (240, 153)
48 (158, 275)
49 (172, 264)
50 (190, 258)
51 (205, 259)
52 (218, 254)
53 (238, 254)
54 (257, 258)
55 (244, 283)
56 (226, 295)
57 (211, 299)
58 (195, 300)
59 (174, 294)
60 (166, 275)
61 (191, 268)
62 (206, 268)
63 (220, 264)
64 (248, 261)
65 (223, 277)
66 (208, 281)
67 (193, 281)